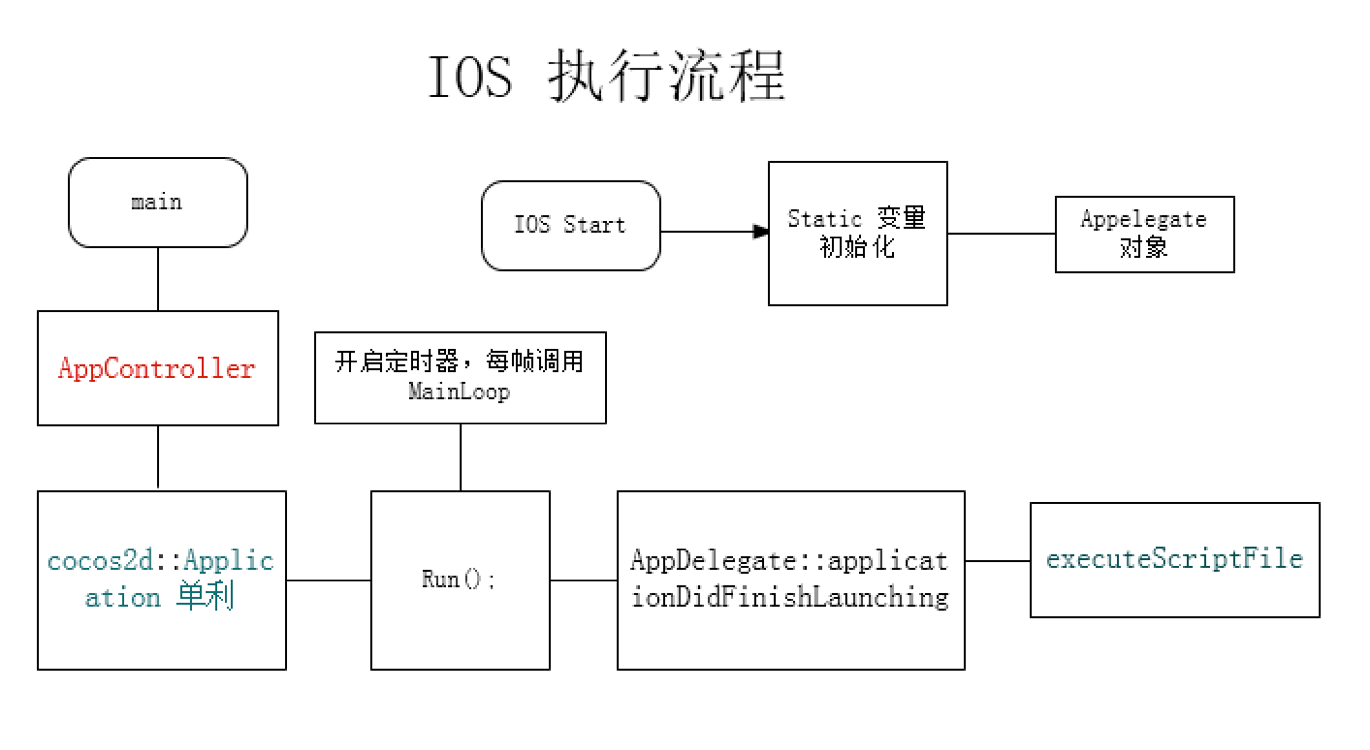
1.Cocos对于IOS来讲 我们知道C语言/C++ 语言的程序入口是 main , IOS 工程一样入口文件在于 ios/main.m
1 int retVal = UIApplicationMain(argc, argv, nil, @"AppController");
这一行代码解释:IPhone初始化应用程序对象,并且传递给应用需要使用的代理类并初始化
1
2
3
4
5
6
int UIApplicationMain ( int argc, char *argv[], NSString *principalClassName, NSString *delegateClassName );
解释这个函数:第一个,函数传入参数的个数,第二个,参数列表,第三个,UIApplication或其子类的名字,如果设置为nil,默认为UIApplication 第四个,应用程序使用的代理类名,传入以后会进行实例化然后给Application 设置代理。如果 (principalClassName)为nil ,程序会从Info.plist中获取,如果Info.plist中没有响应的Key,那么默认是UIApplication
所以main调用以后代码会在 AppController 中执行
因为AppController 是 UIApplicationMain 的代理
1
2
3
4
5
6
7
8
9
10
11
- (BOOL)application:(UIApplication *)application didFinishLaunchingWithOptions:(NSDictionary *)launchOptions { //这个函数体会显现的比价重要 //cocos Application的单利 cocos2d::Application *app = cocos2d::Application::getInstance(); //中间是一系列的初始化 ... //执行了 cocos Application 的run方法 app->run(); return YES; }
当我们发现 cocos Application 生成单利的时候会发现仅仅是返回了 Application 的单利,没有涉及到构造函数,略微感觉奇怪。
1 2 3 static AppDelegate s_sharedApplication;
是全局静态类对象,初始化在main函数执行以前,一旦被创建,在程序执行结束以前都不会销毁
AppDelegate 会不会有一些熟悉?
初始化就会执行下面代码
1
2
3
4
5
6
7
8
9
10
11
12
13
14
15
Application* Application::sm_pSharedApplication = 0 ; Application::Application() { CC_ASSERT(! sm_pSharedApplication); sm_pSharedApplication = this ; } ... Application* Application::getInstance () CC_ASSERT(sm_pSharedApplication); return sm_pSharedApplication; }
到现在这个位置,cocos Application 生成了对象,并且要执行 app->run();
神秘的地方会在run()
1
2
3
4
5
6
7
8
9
10
int Application::run () if (applicationDidFinishLaunching()) { [[CCDirectorCaller sharedDirectorCaller] startMainLoop]; } return 0 ; }
对于cocos lua
1
2
3
4
5
6
7
8
9
10
bool AppDelegate::applicationDidFinishLaunching () if (engine->executeString("require('src/main')" )){ return false ; } return true ; }
lua 虚拟机初始化完毕以后就开始执行了lua 的入口部分 然后执行了启动 mainloop
1
2
//如果认为直接是 Dierctor 执行的mainloop 那么就有一些失望了 CCDirectorCaller 这个才是 [[CCDirectorCaller sharedDirectorCaller] startMainLoop];
1
2
3
4
5
6
7
8
9
10
11
12
13
14
15
16
17
18
19
-(void) startMainLoop { // Director::setAnimationInterval() is called, we should invalidate it first [self stopMainLoop]; //设置定时器 设置定时回调 doCaller displayLink = [NSClassFromString(@"CADisplayLink") displayLinkWithTarget:self selector:@selector(doCaller:)]; [displayLink setFrameInterval: self.interval]; [displayLink addToRunLoop:[NSRunLoop currentRunLoop] forMode:NSDefaultRunLoopMode]; } ... -(void) doCaller: (id) sender { cocos2d::Director* director = cocos2d::Director::getInstance(); [EAGLContext setCurrentContext: [(CCEAGLView*)director->getOpenGLView()->getEAGLView() context]]; // 正常安装60帧每秒进行调用 最终会执行到 熟悉的 Director 的 mainLoop director->mainLoop(); }
最关键的部分来了 mainLoop
1 2 3 4 5 6 7 8 9 10 11 12 13 14 15 16 17 18 19 20 21 22 23 24 25 void DisplayLinkDirector::mainLoop () if (_purgeDirectorInNextLoop) { _purgeDirectorInNextLoop = false ; purgeDirector(); } else if (_restartDirectorInNextLoop) { _restartDirectorInNextLoop = false ; restartDirector(); } else if (! _invalid) { drawScene(); PoolManager::getInstance()->getCurrentPool()->clear(); } }
先写到执行mainloop,cocos中每一个对象如何被渲染下次再细讲 2.对于Cocos Android 的执行流程 如果创建一个空的Android 工程,工程的内容基本包含 AndroidManifest.xml ,Android 逻辑部分 java ,需要的静态资源 res等。
创建一个Cocos 工程同时,Cocos 已经创建了IOS 工程和Android工程, Cocos 的这个Android 工程可以理解为一个空的Android工程
想要知道游戏的启动流程,就需要先知道正常Android 中每一个APP的启动流程
Android 是基于Linux 的,Android 应用安装以后,应用图标可以理解为在一个Launcher 上面挂着,当点击图标的时候
1.系统会去调用 **startActivity(Intent) **
2.第一次执行 Android ActivityManagerService 会创建新的进程来实例化目标activity.
把关注点切回到代码部分
1
2
3
4
5
6
7
8
9
10
11
12
13
14
15
16
17
18
19
<application android:allowBackup="true" android:icon="@mipmap/ic_launcher"> <meta-data android:name ="android.app.lib_name" android:value ="cocos2dlua" /> <activity android:name="org.cocos2dx.lua.AppActivity" android:screenOrientation="landscape" android:configChanges="orientation|keyboardHidden|screenSize" android:label="@string/app_name" android:theme="@android:style/Theme.NoTitleBar.Fullscreen" > <intent-filter > <action android:name ="android.intent.action.MAIN" /> <category android:name ="android.intent.category.LAUNCHER" /> </intent-filter > </activity > </application >
AndroidManifest.xml 文件暂时可以先理解为配置文件。 Android 系统拿到包名,拿到Activity 文件路径,开始执行Activity 的初始化
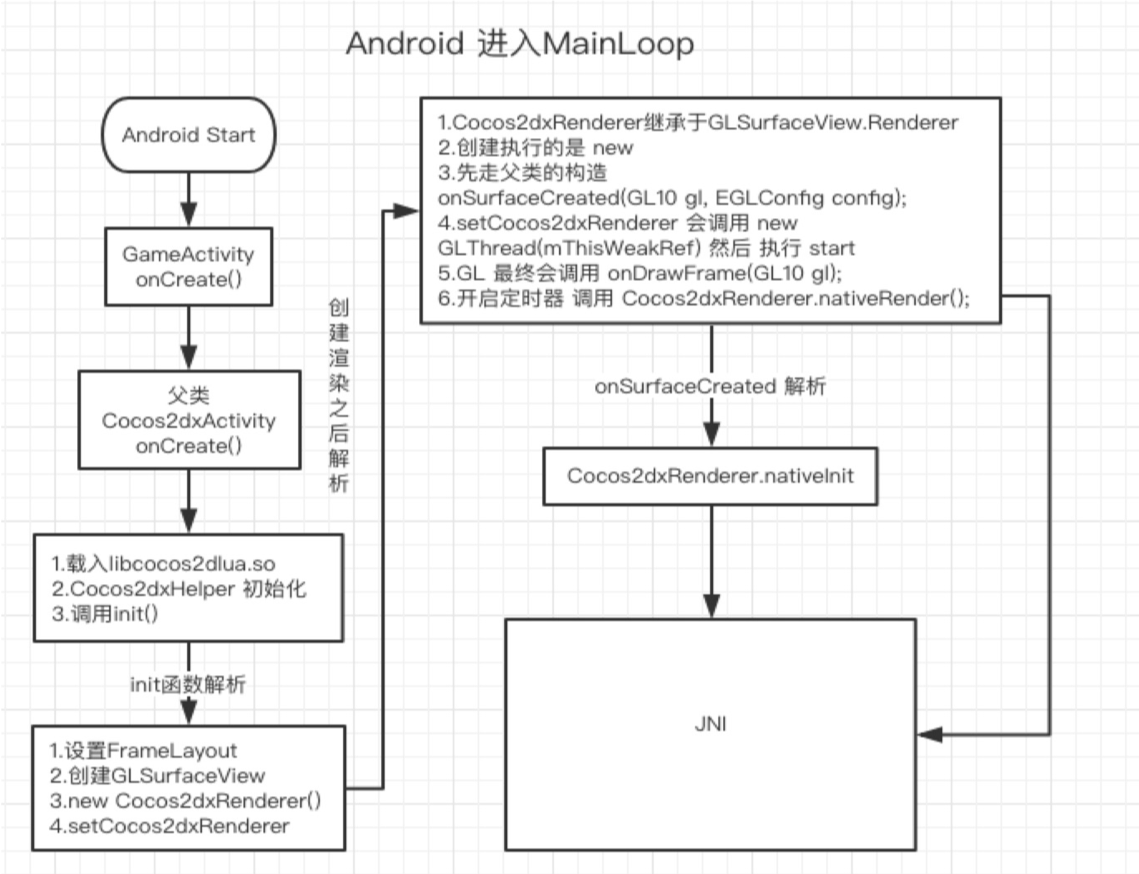
1
2
3
4
5
6
7
8
public class AppActivity extends Cocos2dxActivity @Override protected void onCreate (Bundle savedInstanceState) super .onCreate(savedInstanceState); ... } }
看了代码好像什么都没写,但是Cocos 给出的代码就是这样的,是有问题还是 ?
所以 public class AppActivity extends Cocos2dxActivity 这句话提醒了我们,AppActivity 继承与 Cocos2dxActivity
想要知道 Cocos2dxActivity 真正具有什么内容,需要看下类本身
1 public abstract class Cocos2dxActivity extends Activity implements Cocos2dxHelperListener
代码部分显示 Cocos2dxActivity 继承于常见的 Activity 和 CocosHelperListener
我们暂时关心的是代码执行的逻辑顺序,于是现在急于知道Cocos2dxActivity的onCreate
1
2
3
4
5
6
7
8
9
10
11
12
13
@Override protected void onCreate (final Bundle savedInstanceState) super .onCreate(savedInstanceState); onLoadNativeLibraries(); ... this .mHandler = new Cocos2dxHandler(this ); Cocos2dxHelper.init(this ); this .init(); }
好奇init 函数会有什么惊喜
1
2
3
4
5
6
7
8
9
10
public void init () this .mGLSurfaceView = this .onCreateView(); this .mGLSurfaceView.setCocos2dxRenderer(new Cocos2dxRenderer()); this .mGLSurfaceView.setCocos2dxEditText(edittext); setContentView(mFrameLayout); }
new Cocos2dxRenderer() 这个会让我感兴趣,创建了一个render ,这个render 里面会做什么 ?
1
2
3
4
5
6
7
8
9
10
11
12
13
14
15
16
17
18
19
20
21
22
23
24
25
26
27
28
29
30
31
32
33
34
35
36
37
38
39
40
41
class Cocos2dxRenderer implements GLSurfaceView .Renderer // 就是Gl 需要用到的render ... @Override public void onSurfaceCreated (final GL10 GL10 , final EGLConfig EGLConfig ) { Cocos2dxRenderer.nativeInit(this .mScreenWidth, this .mScreenHeight); ... } @Override public void onSurfaceChanged (final GL10 GL10, final int width, final int height) Cocos2dxRenderer.nativeOnSurfaceChanged(width, height); } @Override public void onDrawFrame (final GL10 gl) if (sAnimationInterval <= 1.0 / 60 * Cocos2dxRenderer.NANOSECONDSPERSECOND) { Cocos2dxRenderer.nativeRender(); } else { final long now = System.nanoTime(); final long interval = now - this .mLastTickInNanoSeconds; if (interval < Cocos2dxRenderer.sAnimationInterval) { try { Thread.sleep((Cocos2dxRenderer.sAnimationInterval - interval) / Cocos2dxRenderer.NANOSECONDSPERMICROSECOND); } catch (final Exception e) { } } this .mLastTickInNanoSeconds = System.nanoTime(); Cocos2dxRenderer.nativeRender(); } }
从点击icon 到Activity 的初始化,程序做了这么一些事情
Activity 的onCreate
Activity 的父类的 onCreate
Activity 父类的 init()
Cocos Render 对象的初始化
Cocos Render 对象初始化以后 调用 nativeInit
每一帧调用c++ 部分的nativeRender
下面是nativeInit
1
2
3
4
5
6
7
8
9
10
11
12
13
14
15
16
17
18
19
20
21
22
23
JNIEXPORT void Java_org_cocos2dx_lib_Cocos2dxRenderer_nativeInit (JNIEnv* env, jobject thiz, jint w, jint h) auto director = cocos2d::Director::getInstance(); auto glview = director->getOpenGLView(); if (!glview) { glview = cocos2d::GLViewImpl::create("Android app" ); glview->setFrameSize(w, h); director->setOpenGLView(glview); cocos2d::Application::getInstance()->run(); } else { cocos2d::GL::invalidateStateCache(); cocos2d::GLProgramCache::getInstance()->reloadDefaultGLPrograms(); cocos2d::DrawPrimitives::init(); cocos2d::VolatileTextureMgr::reloadAllTextures(); cocos2d::EventCustom recreatedEvent (EVENT_RENDERER_RECREATED) ; director->getEventDispatcher()->dispatchEvent(&recreatedEvent); director->setGLDefaultValues(); } cocos2d::network::_preloadJavaDownloaderClass(); }
下面是nativeRender
1
2
3
JNIEXPORT void JNICALL Java_org_cocos2dx_lib_Cocos2dxRenderer_nativeRender (JNIEnv* env) { cocos2d::Director::getInstance()->mainLoop(); }
当IOS 和Android 部分执行到Mainloop , 启动的差异就已经被屏蔽了